Tag Archives: Gardening

New Raised Beds Ready for Spring

After moving house a couple of years ago we were reluctant to build a full on vegetable garden straight away until we had lived in the place a bit and gotten used to the micro climate of the property.

We are in a hilly area (for SE England) so get lots of high winds. Also the garden slopes down to the North which isn’t the best for growing. Despite that we are in an elevated position so get reasonable amounts of direct sun. The sandy soil means we need to water a fair bit which should be a bit easier since we got the tap installed next to the beds.

Last year we had just two beds as an experiment and had great success growing all sorts of vegetables including spinach, beetroot, lettuce, leeks, potatoes and tomatoes. Once we were comfortable that the beds were in the right place int he garden we finally decided to bite the bullets and build another 3, taking the total number of beds to 5.

Unfortunately for me the layout we chose meant I had to move the two existing beds away from the hedge slightly so a busy afternoon off work was required to build the 3 new beds and get all 5 in the desired place! Here is the result:

Raised Beds,Veg,

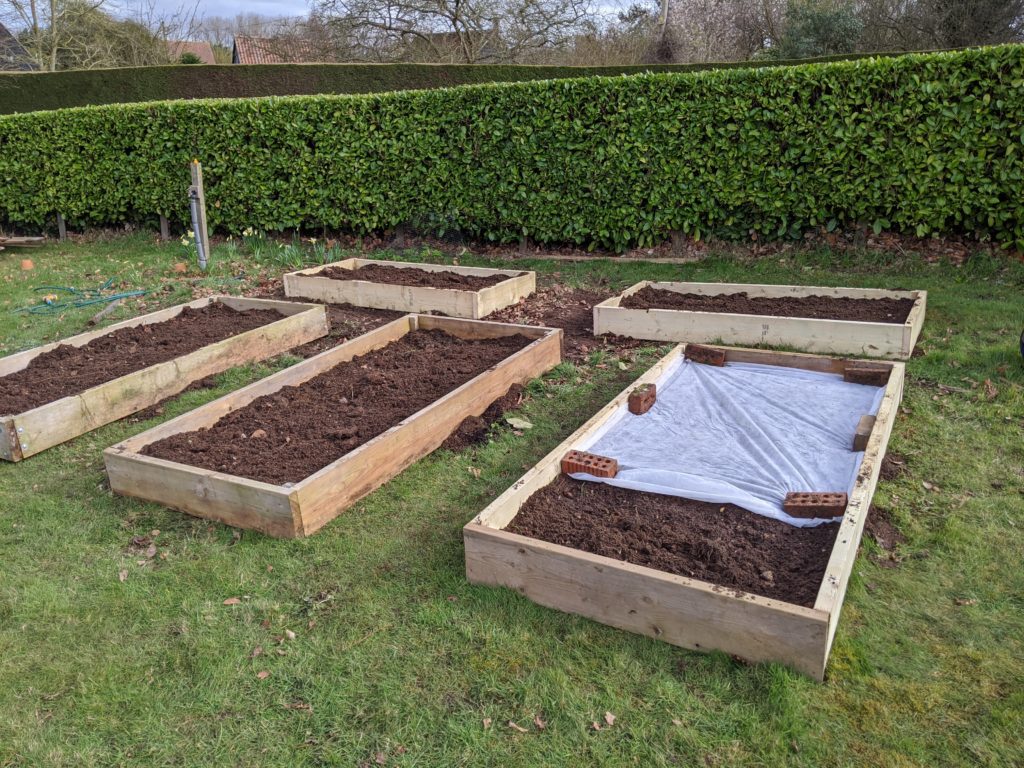
The two beds at the back are 2m x 1m while the three at the front are roughly 2.5m x 1.25m and the gaps between the beds are roughly 0.8m. The timber is pressure treated 9″ x 2″ from a builders yard. It came in 4.8m lengths so there was a bit of cutting down to do.

Thankfully when we moved in there was a huge long neglected pile of compost at the bottom of the garden. There was more than enough to fill the beds with 15-20cm of compost. I’ve recently been binge watching Charles Dowding on youtube who if you don’t know him is a market gardener who promotes the no dig method. As a result I didn’t dig over any of the grass on which the raised beds were placed. Fingers crossed the vegetable can grow well enough in the compost i’ve laid on top and the weeds/grass below is smothered and doesn’t grow through!

Eventually we plan fence the whole area in to help protect the veg from rabbits. When we do this i can envisage laying some anti weed membrane down between the beds and sourcing some bark chippings on the paths between the beds. However that can wait for a few more weeks (at least!) as we’re planning to get a greenhouse installed just to the left of the beds now that spring is around the corner.

Perenial Sweat Peas

I’m a big fan of perennial flowers in the garden as I like to divert most of my limited time to growing vegetables. Nothing says ‘English summer’ quite like a sweet pea in full bloom. Until a couple of years ago sweet peas were one of the few annual flowers I used to grow from seed each year. That all changed when I discovered this perennial variety.

Perenial Sweet Peas

These plants came form seeds that my father saved and gave to me. He in turn was given some seed form one of his best friends (acquiring successful plants in this way is so much more satisfying than going out and buying ready grown, established plants form the garden center).

I’m not 100% sure of the variety but I suspect it is Lathyrus latifolius.

Maintenance is very easy. As they grow in Spring and early Summer I simply tie them up against the pillars which they’re planted near. They grow vigorously and are fairly sturdy so it’s not a fiddly job.

As with most flowers once they start to flower, dead heading will help to encourage more blooms. They provide a constant stream of deep pink flowers right into autumn.

At the end of the summer the plants will dry out and die back. Before cutting them back I take the opportunity to save some seeds and pass on to friends and family.

The only downside to these perennial sweet peas is that they do not have much scent compared to some of the annual varieties I’ve previously grown. Apart from that these should be a must in any English garden.

Improving Vegetable Bed Soil

The soil in our  vegetable beds has been consistently poor over the last couple of years. Always very crumbly it seems very loose and doesn’t hold the moisture (and as a result nutrients) very well at all.

While the soil in the rest of the garden is generally good theses particular beds seem to be the exception. Even the odd top dressing of compost doesn’t seem to have made much difference to the structure of the soil so I thought it about time to add some manure.

The beds are slightly raised and adjacent to a wall. On the other side of the wall are several very large trees that I suspect of draining much of the moisture away.

When we moved in to the house the beds contained various grasses which, with hindsight, indicate that the area isn’t the wettest.

Repairing Dry Loose Soil

So its time to try and improve the structure of the soil and in particular improve its moisture retention. Luckily we leave near to several stables so there is no shortage of horse manure locally.

When adding manure to the garden its always best to add manure that has rotted for a few months if possible. If not it will likely burn your plants as it’ll be far too rich in nitrogen.

If like me you only have a supply of fresh manure then the best time to add it to your soil is in the Autumn. This means it has time to mature before you plant into it next spring.

Improving Soil

To dig or not to dig?

When adding manure there is always the question of whether to dig it in or not. Personally I prefer to simply add a layer (a few inches thick) to the surface of the bed and leave it over winter. To me this has a few benefits over digging it in:

– the rain and worms will gradually draw the nutrients and bulk down into the soil over the winter, saving you the hard work.

– by sitting on top of the bed and acting as a mulch over the winter, weed growth will be kept to a minimum

– the mulching will also retain moisture in the soil over the winter period

– this no dig approach will require less work and the beds will only require a light forking over in the spring as opposed to a severe digging in now

Aloe Vera Cuttings

I’ve been waiting over the winter for the time to come when I could take some ‘pup’ cuttings from our aloe vera plant. As you can see from the photos below, Aloe Vera plants tend to self produce babies or pups that sprout up from the root system of the main plant.

Now that the worst of winter seems to be past us i’ve decided to finally go ahead and split these baby aloe pups from the main plant. They should make good little gifts for people over the summer.

Aloe Vera Plant

Aloe Vera Babies

Aloe Vera Big Baby

General advice seems to be to wait until the aloe vera pups have about 3 leaves of their own before trying to separate them.

I simply dug away the soil around the pup, exposing the root system then carefully cut away from the mother plant with a sharp knife. You should leave as much of the root system on the pup as possible to help it establish itself.

Alo Vera Cuttings-2

As with any cutting it’s best to keep the freshly potted Aloe pups out of strong direct sun and spray/mist regularly with water in order to help keep them moist. I’ve put these three in a propagator to help keep the moisture levels up but a simple plastic bag would do just as good a job.


Return of the Bougainvillea

A few weeks ago I posted about our rather unhappy bougainvillea. After suffering from multiple aphid infestations and the cold nights in our conservatory it had dropped all of it’s leaves and I feared the worst.

Bougainvillea Buds

Bougainvillea Care in Winter

Bougainvillea Sprouting

Well as you can see I’m please to report that it is now on the road to recovery. All i did was give it a couple of good sprays to deal with the aphids and move it into our living room which has a much warmer temperatuure over night. It’s been happily sat infront of the patio doors, next to a radiator so it’s been gettign plenty of heat and light.

Fingers crossed she’ll be back to her magnificent best soon now that the worst of the winter is [hopefully] out of the way. It’s always satisfying when you manage to revive a plant that appears to be on deaths door…it’s amazing the difference a few degrees can make.

An Unhappy Bougainvillea

Last summer we bought a small bougainvillea from the local garden center. My wife loves these plants and was forever reminding me every time we saw them while away on holiday. In the last couple of years I kept noticing them in garden centers and debated whether they’d survive the winter here i the UK.

After buying it we kept it in our south facing conservatory and it didn’t seem to do too well. After a few weeks it stopped flowering and was looking rather unhappy. After upping the watering considerably and feeding once a week it burst back into flower and kept going all summer right through until about early November.

Recently it has been looking more and more unhappy. Not only has it been infected with aphids (which i’ve sprayed) but it has recently dropped all of it’s leaves. As you can see below it looks more than a little sorry for itself.

Bougainvillea Leaf Drop

Bougainvillea Leaf Drop

I suspect the leaf drop is as a result of the very cold temperatures we’ve been having. Night time temperatures in the conservatory have been falling to about 10 degrees Celsius so I’ve decided to move it back into the living room where the temperatures are a bit warmer.

After doing a bit of research here’s the general advice I’ve found for looking after bougainvillea plants:

  • They like being pot bound
  • Don’t feed if overly dry roots, water first
  • Feed once a week
  • Give as much sun as possible
  • Keep in frost free environment during winter

I also read that bougainvilleas can drop their leaves in temperatures under 10 degrees. Hopefully with a little TLC I can revive this plant and get it back to it’s best in the Spring.

Planting a Bare Root Rose in Frozen Ground

After recently choosing and buying a bare root rose for our walled garden I was a bit dismayed when six inches of snow and freezing temperatures arrived a few days after I got the new rose planted in the ground.

When researching how best to plant bare root roses all of the advice I read said not to plant them in frozen ground. As temperatures began to plummet last week (they reached a low of -13 degrees Celsius) I soon began to get worried about the effect of the ground freezing around the roots so soon after I planted it.

One evening I got my thinking cap on and decided I needed to somehow protect the rose from the impending night time frost. This is what I came up with…

Planting a Bare Root Rose in Frozen Ground

Planting a Bare Root Rose in Frozen Ground

The solution I came up with was to place a small plastic cloche over the rose in order to keep the snow and frost off the plants but to also hopefully keep some of the heat in the soil and prevent the root ball from freezing.

Fingers crossed this will have been enough to keep the plant alive and that I got it in place before the roots were frozen into the ground. The soil underneath feels soft still so hopefully I got there just in time.

Planting Bare Root Roses

Bare root roses are becoming increasingly popular. In this post we’ll discuss the benefits of bare root roses over potted varieties as well as proving some easy to follow instructions telling you how to plant them.

Below is the what a bare root rose looks like just after it arrived in the post.

Bare Root Rose

Why Choose a Bare Root Rose?

Below are a few of the reasons I chose a bare root rose over a pot grown variety.

1. Variety. First of all by buying a bare root rose via the internet/post there is a much much bigger variety to choose from than if i went round my local nurseries. By buying a bare root online i was able to research all the varieties and order exactly the type I wanted.

2. Early Growth. Bare root roses are usually available in mid winter when the plants are dormant. By planting during this dormant period you allow the roots time to establish before the foliage growing season begins in the Spring. Consequently you get more first year growth from a bare root plant compared to a potted variety.

3. Cost. Because specialist growers can post bare root plants they can sell to a wider audience via mail order and the internet. As a result they can grow more plants, stock more varieties and sell each plant for less, all great news for the consumer.

How to Plant a Bare Root Rose

Pre soak. With bare root roses it is essential that the roots do not dry out prior to planting. As soon as you receive them soak the roots in a bucket of water, ideally over night

Location. First of all ensure that you’re planting your rose in an appropriate position. Some prefer more sun than other while some varieties are vulnerable top mildew so planting should be in the open to improve airflow.

Hole. Dig a nice big hole 12 to 18 inches deep and wide. If you planting against a wall ensure the hole is 6″ from the wall so as not to cramp the roots.

Soil Preparation. Roses are quite hungry feeders so make sure your soil is rich by adding well rotted compost. It is also a good idea to  add a root growth powder (usually fungal based) like Mycorrhizal Fungi which add certain bacteria to the roots that promote vigorous growth. Apply such powders once the roots are in the hole allowing some of the powder to cover the roots as well as the surrounding soil, just like in the photo below.

Bare Root Rose Rooting Powder

Bare Root Rose Rooting Powder

Planting. Spread out the roots so they are flat to the bottom of the hole. This will provide the plant stability. The plant should be deep enough so that the bud union is just below the soil line. If planting against a wall it is a good idea to angle the stems slightly toward the wall to help training. Firm in the soil well.

How to Plant a Bare Root Rose

Water and Mulch. Once planted be sure to water heavily, at least a couple of full watering cans. If the soil sinks with all the water then add some more. To help retain moisture around the plant build a small mound of mulch (compost or leaf mold) a couple of inches high.

After Care. Keep an eye on the weather and water if required. Keeping the roots moist really is crucial in the early growth stages until the roots are more established. You shouldn’t need to start feeding your rose until foliage starts to form in the Spring.

Varieties

You’ll soon realize there are hundreds of varieties to choose from when you start researching bare root roses. Be sure to take the time to research which rose is best for you. You’ll need to consider the following things when choosing a variety:

  • Amount of sun exposure of site
  • Growth space
  • Colour
  • Scent
  • Flowering: Once v Repeating
  • Disease resistance
  • Flower shape

The variety I am planting in this post is a Gertude Jekyll climber from the highly recommended David Austin Roses. It is a repeating flowerer so should bloom all summer long with a good fragrance. It’s reasonably disease resistant and vigorous in growth. More importantly it provides bright pink flowers which is the only colour my wife will entertain!

Pruning Espalier Apple Trees

Growing Espalier fruit trees is not only a great way of growing the likes of apples and pears in a confined space but also a way to add attractive plants to your garden. A flowering espalier will make an otherwise boring wall or fence look stunning. Once initially trained espaliers don’t require much care – a quick prune once or maybe twice a year.

When to Prune an Espalier Apple Trees

Most pruning should be done in the middle of winter when the tree is dormant. Anytime between January and March should be fine. On established plants you may need to do some light pruning in late summer in order to help maximize your fruit harvest (more on this below).

Pruning To Train Espaliers

The main purpose of pruning an espalier in the frost 3-4 years of growth is to shape the tree by creating the horizontal leaders/tiers to both create an attractive tree as well as maximizing future yields of fruit.

Unfortunately there are  no short cuts and you’ll most likely be able to gain one tier of horizontals each year. Each year you’ll need to trim back the vertical leader (main stem) in order to encourage new side shoots that will form the next horizontal layer.

Pruning an Espalier Apple Tree

In order to do this prune the vertical leader just above 3 buds. One bud will be the next vertical leader while the other two will hopefully form the next horizontals (one left, one right). Pruning the main vertical leader hard in the winter encourages vigorous growth just below the cut.

Allow the 3 buds to grow throughout the summer and when big enough tie them in position. With the new branches that will form the new tier you may struggle to tie them horizontal at first as their tendency will be to grow upwards. If this is the case you may have to tie them at a diagonal angle first until they are long enough and flexible enough to be bent horizontal.

Depending on the width of your espalier you may want to encourage your horizontal leader to put on growth. To do this simply prune them just after a downward facing bud.

Pruning Espalier Tiers

The downward facing bud will grow out over the next summer to be a continuation of the horizontal tier.

Allowing an Espalier to Flower/Fruit

During this initial training phase some people prefer to remove any blossom the tree puts on in early summer. This ensure that all of the plants growth goes into producing strong leaders and roots rather than producing fruit. Whether you do this is up to you and depends how patient you are!

If allowed to set fruit, young apple trees tend to not fruit too well in the first few years. While the tree is still growing yields can be poor as energy is diverted towards root and foliage growth. Any fruit that does get produced is often bitter tasting and taken by pests. As a result many growers feel it is better to remove flowers from an espalier until the tree is virtually at it’s intended size and shape.

Espalier Apple Tree

Pruning Established Espaliers

Once your espalier is trained yearly pruning should be a relatively simple and quick process.

First you’ll need to prune back the side shoots from your horizontal tiers. Cut these back to 3 leaves from the basal cluster. Prune back growth from previously pruned side shoots to one leaf.

On more mature plants you may need to thin out the buds to prevent the trees spur system becoming too congested. This should be done between January and March.

Radishes are first up

I sowed the first of this years vegetable seeds two weeks ago outside in the raised beds. I sowed spinach, radish, beetroot and carrots (along with lots of onion sets).

Radish Seedlings

Radish Seedlings

The radishes are first up thanks to the great weather we’ve been having over the last couple of weeks. I just need to remember to keep watering the beds through this warm spell to avoid the seedlings getting frazzled!

Radishes are great vegetables t grow for new gardeners as they tend to put up with most conditions, can be sown directly in the ground and grow very quickly so are great for getting a quick crop from empty parts of the vegetable plot.