Radiator Lock Shield Valves – How to

Radiator lock shield valves are the small valves on the other side of the radiator from the TRV valves (the ones with the 1-5 dial on). The can be used to ‘switch off’ the radiator effectively taking it out of the heating loop such that no hot water is pumped through that particular valve.

Here’s which direction to turn the valves:

  • Turn anti clockwise to open
  • Clockwise to close

The best tool to use is a small set of mole grips. Be careful not to over tighten these valves, you don’t need much pressure at all to close them.

Ultra Light Packing for a Beach Holiday

When going on a sunny beach holiday I find I need to take very little luggage. Over the years I’ve refined my packing list and now only take a modestly sized piece of hand luggage which weighs roughly 5-6 kg.

Packing so light makes travelling much easier and quicker. It keeps me more mobile, allows me to spend more time enjoying myself and less time constantly packing and repacking.

Most days i’ll be wearing nothing more than a pair of swimming shorts with a t-shirt/polo/shirt and flip flops. In the evenings I may smarten up and wear a shirt or even chinos but mostly i’ll be going to laid back places where there is no need to dress up.

The Bag

If you’re looking to be a minimalist packer then choosing the right bag is essential. I use an old Timbuk2 Messenger bag in Large size. I’ve also got a Medium that I use daily for cycle commuting/going to the gym/photography etc.

These bags are bullet proof. Discrete, light, comfortable to wear and water proof. I’ve misused and abused both of mine for over 10 years and they both still look brand new.

Packing Light for Beach Holidays

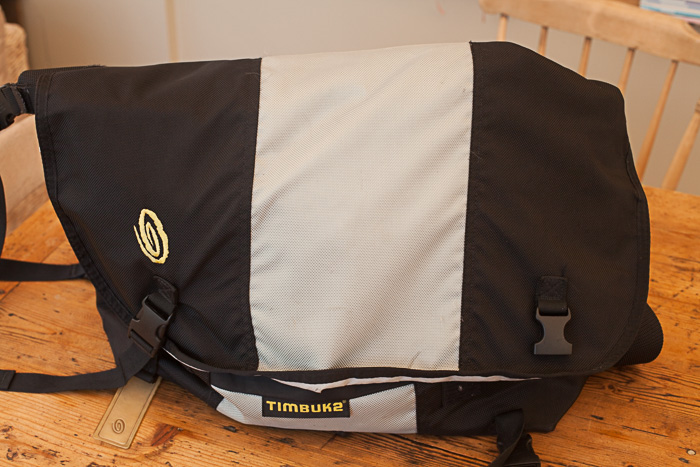
These bags seem to have a capacity to swallow huge amounts of stuff. While that is great I try to not over fill them for the sake of it and just take the essentials. I could fit all of this stuff in the medium but i prefer to use the large and not overfill it.

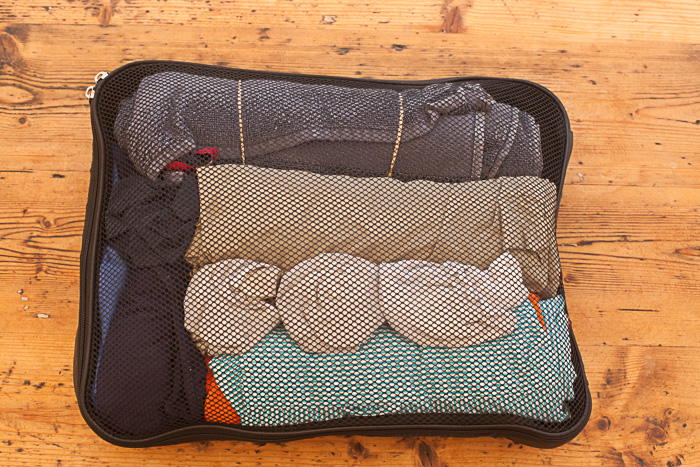
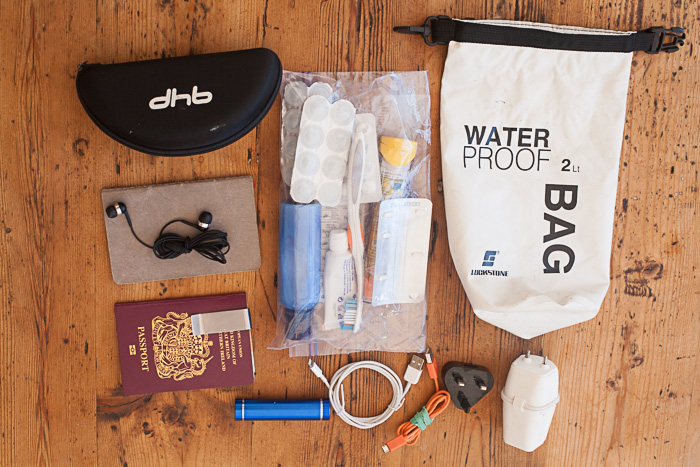
Inside the main bag i use two smaller bags. Firstly a mesh packing cube into which I put all my clothes. Secondly I keep all my chargers/adapters/leads etc in a 2 litre dry-sack to stop them getting lost. This dry bag is also perfect for keeping valuables dry and sand free on day trips to the beach or by the pool.

Ultra Light Packing for Summer Holiday

Toiletries

I use a simple ziploock bag as a wash bag for toiletries. I can take this straight out of my main bag at airport security as it contains all of the few small liquid items that i travel with. The contents are:

  • Contact lenses
  • Toothpaste
  • Shower gel
  • Paracetemol
  • Ibuprofen
  • Antihistamines
  • Epipen (wasp allergy)

I tend to buy sun cream and/or disposable razors (if required) when I reach my destination.

Clothes

Thin layers, things can can re-used in different circumsances and idealy will dry quickly if a wash is needed are the order of the day.

Up top a couple of thin t-shirts, a polo shirt and a regular collared shirt sees me right for most occasions whether it is a night out clubbing, a romantic meal or a days hiking.

Below the belt I take a pair of chinos, a pair of light hiking style shorts and a pair of swimming shorts that also double as casual shorts. Footwear is a pair of trainers and a pair of cheap flip fops.

In addition I also pack a beach towel as often hotels/apartments won’t supply these.

Naturally it makes sense to try and wear your bulky items for the journey. For me this means the trainers and chinos. This helps make the bag as light as possible while travelling. If required when arriving at my hopefully sunny destination I’ll change to shorts in the airport.

A thin Merino wool jumper is a great addition to your packing list. While being light and not very bulky it will provide welcome warmth on a cool chilly early morning walk or an air conditioned airport. I find these Uniqlo Merino jumpers are the perfect mix of cheap and good quality. They keep you warm when needed, dry quickly if wet and don’t have the weight or bulk of many alternatives. Whats more they look reasonably smart which can be useful in some circumstances.

Minimalist Packing - Packing Cube

Here’s my full list of clothes I pack for a week away:

  • Beach towel
  • Hiking Shorts
  • 3 x thin t-shirts
  • 1 x Merino jumper
  • 1 x pair of chinos
  • 1 x polo shirt
  • 1 x collared shirt
  • 5 x boxers
  • 4 x socks

Rolling the larger items before putting them in the mesh packing cube helps keep things organised and crease free.

Ultra Light Packing Accessories

Accessories / Entertainment

I like to keep things simple in this department. These days a smartphone can be most things while traveling:

  • Document storage (ie boarding passes, hotel confirmations etc)
  • Music player
  • Camera
  • Games Console
  • Movie player
  • Book

So thanks to my smartphone I keep keep accessories down to a minimum. Here’s the full list:

  • iPhone
  • Charger
  • Travel plug adaptor
  • Lipstick sized USB power bank
  • Notebook
  • Pencil & Pen
  • Bottle opener
  • Front door key for home
  • Passport
  • Headphones
  • Money clip

Money & Foreign Currency

While we’re on the subject of money….my number one tip is to use a forex app like Revolut.

If you want to avoid all the usual concerns about buying you Euros before leaving and not getting ripped off via poor exchange rates or hidden bank fees when withdrawing cash or using your card abroad maybe take a look at Revolut.

Essentially it’s a prepay MasterCard debit card that lets you exchange your money to one of about 90 currencies fee free at interbank rates via their slick phone app. No fees and no more dodgy exchange rates.

I’ve checked the rates against a Bloomberg terminal at work and they are bang on. As far as I can see the only potential downside is cash machine withdrawals >£500 per month incur a 2% fee so watch out if you’re a big spender or travel a lot for lengthy periods.

The beauty of Revolut is that as long as you’re near a cash machine you don’t need to worry about withdrawing and carrying around large quantities of cash. You can also use your card fee free anywhere that takes mastercard. Whats more if you do lose the card you can cancel it directly from the app on your phone.

Conclusion

Packing light makes it so much easier to stay mobile and active when you’re travelling. By cutting out the unnecessary luggage from you’re trip you’ll have less to worry about and more time to enjoy the experiences you find along the way. 

Perenial Sweat Peas

I’m a big fan of perennial flowers in the garden as I like to divert most of my limited time to growing vegetables. Nothing says ‘English summer’ quite like a sweet pea in full bloom. Until a couple of years ago sweet peas were one of the few annual flowers I used to grow from seed each year. That all changed when I discovered this perennial variety.

Perenial Sweet Peas

These plants came form seeds that my father saved and gave to me. He in turn was given some seed form one of his best friends (acquiring successful plants in this way is so much more satisfying than going out and buying ready grown, established plants form the garden center).

I’m not 100% sure of the variety but I suspect it is Lathyrus latifolius.

Maintenance is very easy. As they grow in Spring and early Summer I simply tie them up against the pillars which they’re planted near. They grow vigorously and are fairly sturdy so it’s not a fiddly job.

As with most flowers once they start to flower, dead heading will help to encourage more blooms. They provide a constant stream of deep pink flowers right into autumn.

At the end of the summer the plants will dry out and die back. Before cutting them back I take the opportunity to save some seeds and pass on to friends and family.

The only downside to these perennial sweet peas is that they do not have much scent compared to some of the annual varieties I’ve previously grown. Apart from that these should be a must in any English garden.

Building a Pallet Wood Store

One of the best things about the house we moved in to about 5 years ago is the fact thjat it has a wood burner in the living room. We’ve been amazed how much please a fire in the living room can provide.

Of course owning a woodburner means that you need to have a constant supply of seasoned (dry) wood. For the last few years the only practical place to store our wood was down at the bottom of the garden which involved barrowing all delivered wood 50 yards and then carrying it back up to the house as and when it was needed – not ideal in the bowels of winter!

So, I finally decided to sacrifice a heavily shaded flower bed on the drive next to the garage and make a wood store from old pallets in a more sensible position!

The construction was pretty simple really after I’d managed to scavenge 3 pallets from a local garden center. The only thing I had to buy was the roofing felt used on the roof.

Pallet Log StorePallet Log Store-2Pallet Log Store-3Pallet Log Store-4Pallet Log Store-5

I’m pretty pleased with the result. I can fit roughly 1.25m3  of logs in the store which is enough to keep us going for a couple of months in winter. I’ve got a similar sized store at the other end of the house too so hopefully I’ve got enough storage next to the house for a winters worth of logs. Now I just need to find a good source of free logs…

Speeding Up Leaf Mold

Speeding up leaf mold production means you can use your mold sooner. In this article we will share a simple tip to help speed up the process.

Leaf mold differs from compost in that it provides very little actual nutritional value to the soil. So why bother with it at all? Well it’s main benefit is that it is great at improving the structure of your soil. This helps the soil retain water (and other nutrients) and provide a good environment for beneficial life such as worms, bacteria and other organisms. If you have heavy clay soil it also helps lighten the loam allowing more oxygen to get to the roots.

Unlike compost, which can be a fickle process to get right, making leaf mold is pretty simple. Simply sweep up your leaves and dump them in a pile in a shady corner of the garden and let nature do it’s work. The down side with this method is that it can take a while (up to 2-3 years) for a pile to break down fully.

A simple way to speed up the process dramatically is to reduce the size of the leaves you add to the pile. A garden shredder is a good tool for this, even if somewhat time consuming.

My technique to speed up my leaf mold is to use a lawn mower. I simply sweep the leaves into a long line and  pass over them with a lawn mower. The mower will pick the leaves up and chope them up as it goes. The end product is a leaf pile that is already partially broken down.

Speeding Up Leaf Mould

Speeding Up Leaf Mold

Using this technique I find that the leaf mold is perfectly useable by the following summer. I use the resulting leaf mold in two ways. Firstly as a mulch in summer to retain moisture. Secondly as a general soil improver which i add to the vegetable beds over winter.

Organic Fire Lighters

I’m increasingly keen on using what nature has to offer to replace man made and shop bought alternatives. This probably explains the ever increasing amount of fruit and veg plants in the garden.

Last summer while out walking we collected a load of fallen pine cones with some vague ideas about making Christmas decorations with them. Instead after drying out over the summer they ended up being used as fire lighters/kindling in our wood burner.

Pine cones make remarkably good kindling and I’ve found with just a sheet or two of newspaper and a few pine cones i can get the wood burner lit in just a minute or two.

So on Sunday while out walking we found a plentiful in a local wood and managed to re-stock our supply to get us through the winter!

natural firelighters-2

natural firelighters


Oh and while we talking about recycling there’s no need to buy nasty chemicals to clean the glass on your wood burner. Instead here’s how i clean it with the ash inside the burner.

Improving Vegetable Bed Soil

The soil in our  vegetable beds has been consistently poor over the last couple of years. Always very crumbly it seems very loose and doesn’t hold the moisture (and as a result nutrients) very well at all.

While the soil in the rest of the garden is generally good theses particular beds seem to be the exception. Even the odd top dressing of compost doesn’t seem to have made much difference to the structure of the soil so I thought it about time to add some manure.

The beds are slightly raised and adjacent to a wall. On the other side of the wall are several very large trees that I suspect of draining much of the moisture away.

When we moved in to the house the beds contained various grasses which, with hindsight, indicate that the area isn’t the wettest.

Repairing Dry Loose Soil

So its time to try and improve the structure of the soil and in particular improve its moisture retention. Luckily we leave near to several stables so there is no shortage of horse manure locally.

When adding manure to the garden its always best to add manure that has rotted for a few months if possible. If not it will likely burn your plants as it’ll be far too rich in nitrogen.

If like me you only have a supply of fresh manure then the best time to add it to your soil is in the Autumn. This means it has time to mature before you plant into it next spring.

Improving Soil

To dig or not to dig?

When adding manure there is always the question of whether to dig it in or not. Personally I prefer to simply add a layer (a few inches thick) to the surface of the bed and leave it over winter. To me this has a few benefits over digging it in:

– the rain and worms will gradually draw the nutrients and bulk down into the soil over the winter, saving you the hard work.

– by sitting on top of the bed and acting as a mulch over the winter, weed growth will be kept to a minimum

– the mulching will also retain moisture in the soil over the winter period

– this no dig approach will require less work and the beds will only require a light forking over in the spring as opposed to a severe digging in now

Sloe Gin Recipe

While out for a walk on Sunday we spotted several blackthorn bushes laden with sloes. This reminded me of last years failed attempt to make sloe gin. We left the picking far too late. By the time we finally headed out to pick some sloes, those that the birds hadn’t eaten were all well past their best.

Here in South East England September is usually the month when the sloes ripen. Obviously weather variations can shift the ripe period back and forth. It’s best to just keep an eye on the bushed local to you when you head out for a walk. I’ve detail our tried and trusted sloe gin recipe below.

What is Sloe Gin?

If you’re keen to start dabbling in a bit of foraging or like the idea of making some home brew then sloe gin is a great introduction to both. Sloes are one of the most common hedgerow berries in the UK and are a distant relative of the plum. They are small blue/grey fruits that grow on the blackthorn bush which is common amongst hedgerows throughout much of England.

To make sloe gin you simply infuse regular gin with sloes, adding some sugar which helps extract the juice from the berries as well as sweeten the final drink. After allowing the juice to infuse with the gin and sugar for a few months you simply strain and end up with a ruby red gin with a great flavour.

sloe gin recipe

When Are Sloes Ripe?

Depending on the weather the best time for picking is September and October. The fruits are naturally hard and bitter so don’t expect to be feasting when picking sloes. When they’re ripe sloes should not be rock hard but have a little give.

In late summer/early autumn keep an eye out in the hedge rows and you should spot the purple/blue berries appearing. If you can try not to pick them too early as unripe sloes won’t produce too much flavour for your gin.

Once you’ve picked your sloes, the only other ingredients you need is some granulated sugar and some gin. I don’t use premium gin as the sloes and sugar will add a lot of flavour enabling you to get away with using cheaper liquor. Oh and you will also need some large kilner jars (available here).

Sloe Gin Recipe Ingredients

  • 800 grams of sloes
  • 70cl of gin
  • 200 grams of sugar

Method

1. First of all wash your sloes and ensure you’ve removed all of the leaves, twigs and bugs.  You don’t have to be too fussy as you’ll be filtering all of the impurities out after 12 weeks anyway.

2. Next you need to pierce the skin of the sloes to help them leach their juices into the gin. The slow method is to prick each one a couple of times with a fork or pin. The quick method is to freeze the sloes over night then take them out of the freezer for a couple of hours and as they defrost the skin bursts, saving you the hard work.

This freezing method has the added benefit that some people believe that you shouldn’t pick the sloes until just after the first frost – it is thought that this freezing activates the sugars in the sloes which in turn enhances the flavour of the final liqueur.

What Is Sloe Gin?

3. Next you need to sterilise your bottles/jars. The easiest way to do this is the pop them into an oven for 10 minutes at about 170 degrees. To sterilise the lids/rubber seals boil them in a pan of water.

4. Place the gin into your bottle/kilner jar then simple add the sloes to almost fill up the bottle. Next add in the sugar and seal tightly before giving it a good shake.There’s no need to worry about dissolving all of the sugar as this will happen over the next few days. Try to fill the bottle/jar as much as possible, the more air that is in there the greater the chance of bad bacteria spoiling the flavour of your final liqueur.

5. Store the bottle/jar in a cool dark place and for the first couple of weeks give it a little shake/turn every day to help dissolve the sugar and get the flavours mixing. After this first week or two turning the bottle once a week should suffice.

6. After three months it’s time to decant the gin, removing the solids so it can mature further and be stored for a long time (if required). I use a small kitchen funnel and tea strainer to help separate out the sloes from the gin. Once you’ve strained it you should end up with a clear dark red liquid.

7. Now i simply re-bottle the gin into freshly sterilised bottle and store. You can start drinking it straight away but it will keep for many years and it definitely improves with age.

Sloe Gin Recipe

While I’ve described the basic sloe gin recipe above some people recommend putting a small amount of almond or vanilla essence. I’ve also heard cinnamon complements the flavour of the sloes well but i haven’t tried it yet, maybe i’ll try that next year.


Time to Take Basil Cuttings

After finally discovering the secrets of growing basil last year it is long overdue i started off some more basil plants. The only way to grow basil is on mass so you don’t feel guilty cutting back a whole plant to make a nice fresh pesto. After experimenting with growing from seeds I dind by far the quickest and easiest way is to start off with a supermarket bought basil plant.

I simply take about 15-20 cuttings from the original plant as soon as i get it home and pop them into small glasses of water. They’re left on a bright windowsill that doesn’t get too much direct sun. After 2-3 days this is what you get….

Basil Cuttings

It always amazes me how quickly the roots grow  from these basil cuttings. The above plant is only 5 days old! I’ve just potted up the cuttings into regular compost to grow on. I usually pinch out the tops after 2-3 weeks of further growth to help the plants bush out.

I’ve found the real secret to growing basil is to no let it have too much direct sunlight. In our kitchen we have a small dormer window that get plenty of light but not too much direct – only an hour or so in the morning. It seems to be the perfect place to grow basil. Hopefully it won’t be long before pesto is on the menu…